Showing posts with label turkey. Show all posts

Tuesday, November 30, 2010

Thanksgiving Day!

T

Here’s a little peek into our Thanksgiving! It began with some really amazing appetizers. These bacon wrapped little smokies were a cinch to make and they were a huge hit.

T1 T2

There was also a fiesta cheescake and phyllo wrapped brie and jam. Yum!!T3 T4 

We didn’t have any complaining guests. We had great company!

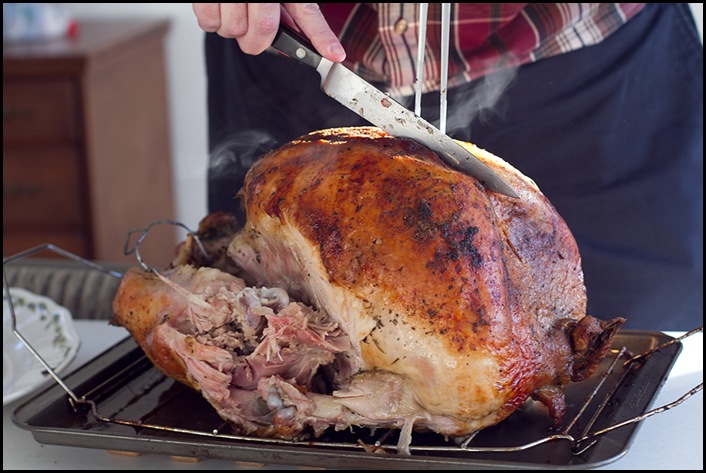
T7My master turkey carver always dreamed of being a surgeon, so we stay out of his way while he’s carving. Look the turkey is still steaming hot after an hour out of the oven.T9T8 T11 T10

The company was great and the conversation was infectious. Can you tell?T12 T6T5T13T15 T14  T16 We even had some drop in guests. I love that!T17

You can’t have a large, wonderful meal without dessert. We were spoiled with an assortment of pies! That wasn’t the end of out Thanksgiving so you’ll have to stay tuned for more to come….

Wednesday, November 24, 2010

Get Your Turkey Ready

I suppose it may be a little to be posting this, but maybe not if you are a night owl? While I grabbed my turkey brine mix at World Market this turkey brining bag caught my eye. I decided to get one and try it out.

 Holy huge! This bag rocks! See this turkey? It's twenty-three pounds. Yes, 23 pounds. Last year I used a roasting bag and it was a little tight. The year before that I used a 2 gallon ziploc bag. I didn't think this turkey would fit into a 2 gallon bag. I was right. If you see one of these brining bags snatch it up. I highly recommend it. It is essentially an oversized ziploc bag, but with a gusset on the bottom so it stands upright. It will hold a massive turkey and a ton of water.

 Place your turkey in the bag. Then pour your brine over the top of it. Continue to add ice cold water until the turkey is completely submerged. I think it was about 3 gallons of water that we put in there.

 Rachel was my helper for the morning. 
The we just stuck the whole turkey in this ginormous bowl and I stuck in our garage refrigerator. Now I know that some people just use a large 5 gallon bucket and don't even use a bag. That works as well. There are so many different ways to get the job done!

Okay, let's keep moving. Maybe I can still be of some help to someone.  Tomorrow when you decide to roast your turkey dump out all of the brine and give your turkey a nice bath.  Then place your turkey on a rack in a roasting pan. Next I melt a stick of butter and add some turkey herbs to the butter. Then I spread butter all over the turkey. If you don't have a turkey herb mixture here is what I sometimes use:


1 sitck of butter, melted
2 tablespoons garlic powder
2 teaspoons dried basil
1 teaspoon ground sage
1 teaspoon salt
1/2 teaspoon black pepper

Preheat your oven to 500 degrees F. Yes, 500 degrees. 

Baste your turkey with your butter and herbs mixture. Just slather it all over. I even lift the skin up a little and put some straight onto the meat. Hold a little butter back for later.

Cover your turkey with foil.  Place the turkey in the oven. We have a thermometer probe connected to our oven, so I usually stick that in there as well. Roast the turkey for 30 minutes at 500 degrees.
Then lower the oven temperature to 350 degrees F.

Roast the turkey until the temperature reaches 165 degrees internally. Then pull the foil off. Slather some more butter and herbs on the turkey. Keep roasting until the temperature reaches 175 degrees or so. Don't worry if your oven starts smoking a little. It's just the butter and it's normal. The turkey should now look beautiful and brown.

Take the turkey out. It will continue cooking itself slightly. Let the bird sit for about 30 minutes before carving. I usually keep it covered with the foil until it's ready to be carved. Good luck and email me if you have any questions. I'm not the Butterball lady, but hopefully I can help you with what has worked for us. 

Happy Thanksgiving!!!

Saturday, November 20, 2010

Thanksgiving Plans

Do you have big plans for turkey day? We usually invite friends and church members over that don't have other plans.  I will admit that I love cooking for this holiday. I'm not going to lie. I find it fun and challenging.  Am I crazy? Maybe that is why we don't go anywhere for the holidays. 

 I'll let you in on another secret. Turkeys are dirt cheap right now, so I stock up. You don't have to eat turkey only at Thanksgiving or Christmas. Since we have a large family, by today's standards,  I am always trying to make dinners for dirt cheap. You can't beat feeding a family of eight with a 12 lb turkey for $5, right? While I love trying new recipes, if I find something that works extremely well, I stick with it. I've been making turkeys now for a few years and once I discovered what brining a turkey was I've never turned back. Now the first time I brined my turkey it was last minute thing that I kind threw together. It was great, but a lot of work. The next year I found a brine mix from World Market. I've used this mix every year since. This year when it went on sale, I stocked up. I've only been able to find this mix around Thanksgiving, so I bought 4 of them. HERE is a link to how this brine works and how I cook my turkey.

Once you prepare your brine, soak your turkey for about 24 hours in the the brine.
Butter is my best friend! I mix herbs with melted butter and slather it all over the turkey and voila!

Besides turkey, what other sides are you planning to make? 
Pineapple Cranberry Relish has become something I make every year now. I've never been a big fan of the canned jelly cranberry sauce, so when I found this recipe I just kept making it. It give a great tang to the turkey and it's even better the next day on a sandwich. Try it out.
I haven't gotten my whole menu put together, but here are some recipes you might be interested in trying for your meal:
Share with me some of your recipes and maybe I'll make it and post it on here!

Monday, November 30, 2009

The Secret to My Turkey is…

Turkey2That’s right!  Turkey Brine.  Ever since I started brining my turkey I have never stopped getting compliments and comments about how moist the turkey turned out.  It’s a super simple step before roasting your turkey.  You just have to remember to start a day earlier.Turkey4This year I cheated.  I found a premade brine mix.  Last year I made my own.  It took a little more thought, but it was still easy.  All you do is boil a few cups of the brine in a few gallons of  water until all the salt is dissolved.  I actually let mine simmer a bit since it smelled so good and the aroma just filled our home.  It was nice.T1After boiling the brine I put it in the fridge to cool. While it cools prepare your turkey.  I put my turkey in a roasting bag and once the brine has cooled I just pour it into the bag.  I think there ended up being about three gallons of liquid for my 18 pound turkey.  You want to make sure that the whole turkey is covered with liquid.  Then put the whole thing into the fridge and leave it overnight. T2The next day just before you are ready to roast your turkey drain and discard of all the brine and liquid. T3This is what I was left with.  Look at all those beautiful spices. I believe that the salt in the brine changes the chemistry in the turkey.  I think that’s the secret to a moist and soft turkey.  But then again I didn’t do too well in chemistry, so this is all just speculation.T4Next give your turkey a nice bath.  Then set it on your roasting pan and pat it dry.  Oh, believe it or not I don’t own a roasting pan.  I just use my broiler pan and stick a rack on top of it.  It has worked out for years, so I doubt I’ll be purchasing a roasting pan anytime soon.  Shhh….don’t tell anyone who actually knows what they’re doing when it comes to cooking a turkey.  I’m just showing you what I do and it’s probably against some cooking law.  Who knows. T6Again this year, I cheated and found some “turkey herbs.”  In years past I have loved using fresh herbs like Thyme and Rosemary.  I’m getting old and lazy.  Anyways, I then mix my herbs with a stick of melted butter and slather it all over the turkey.  I even tuck a little in underneath the skin.  Then cover it with foil and I stick a temperature probe into the thigh.  I have one of those fancy ovens that keeps the temperature for me.  When the temperature reaches about 170 degrees I remove the foil and slather more butter on top of the turkey. T7Voila!  When the temperature hits 180 you’ll end up with this amazing looking bird. T8 This is my master turkey carver.  You’ll never see his face.  He shuns me whenever I pull out my camera.  He’s a member of our church.  No, it’s not Jared.  Anyways, my master turkey carver told me that he almost thought the turkey wasn’t fully cooked because when he went to carve it for the first time the juices squirted out onto to him.  That’s how moist the turkey was.  I’m not kidding.  You know how everyone always wants to eat the dark meat because the white meat often comes out too dry?  Well not anymore… if you start brining your turkey.
So that is how I do my turkey.  Be sure to check back later.  I’ve got some more recipes to share and our fun Thanksgiving with our friends.  Good times for sure!